Showing posts with label pie. Show all posts

Saturday, October 6, 2012

Attempted Chocolate Pudding Pie

As pretty as it looks, this is a fail that I am not proud of.

I tried to make Great Grandma's Chocolate Pudding from Joanne Fluke's Cream Puff Murder, I really did.  But despite my attempts at tempering the egg yolks and the chocolate, I somehow managed to scramble those yolks.  And the chocolate did not melt all the way.

But put it in a graham cracker crust, top it with whipped cream, and feed it to unsuspecting relatives - they'll never know the difference! ;)

So, this was a failure.  Just thought I should put this out there because I do make mistakes sometimes, and anyway these are pretty pictures. :)
Let me know if you have any success making this pudding into a pie!  The recipe can be found here.
-JJ

Wednesday, August 15, 2012

Key Lime Pie

Now, first off, I'll apologize for the crappy lighting on this picture of the pie.  I'm sorry.  Now I'll tell you why it happened.

This pie is the dessert I baked in Minnesota for the Fourth of July.  We'd have a nice ol' grill and a piece of pie to finish off the night as we listened to fireworks exploding in the distance.  (Watching them was not an option - we didn't have lawn chairs and you do not want to sit outside at night in northern Minnesota for more than one minute.  Then you're just a mosquito buffet table.)

But, surprise surprise, a storm hit and our power was out.  You can see the beginnings of the storm, sort of, in the window.


Luckily, the pie had already been baked, but we had to eat it in the dark.  Which means only that one picture at the top of the post of the finished thing, all nicely sliced up.

So as you can tell from the pictures, I made this at the cabin, on that beautiful lime green table.  (See what I did there?)  It's seriously the smallest kitchen I have ever been in that isn't inside a hotel.  Actually, I've been in hotel room kitchens that are bigger than that kitchen.  But not as well-stocked.  No, we've got all the spices.  And like three pounds of raisins.  Not kidding.

Anyway, a key lime pie is pretty easy to make, and rather than just use the recipe off the back of the key lime juice bottle for the zillionth time, I decided I'd try Joanne Fluke's recipe from, you guessed it, Key Lime Pie Murder.

It's lighter and fluffier and easy to make and very good.  And yes, this is made with a meringue, and yes, you absolutely should make this with the meringue.*  If you don't want to make a meringue, then don't use this recipe and use the one off the back of the key lime juice bottle.

Key Lime Pie
REQUIRES EGG WHITES AT ROOM TEMPERATURE

1 graham cracker crust
5 eggs
14-ounce can sweetened condensed milk
1/2 cup sour cream
1/2 cup key lime juice
1/4 cup sugar
1/2 teaspoon cream of tartar
pinch of salt
1/3 cup sugar
  1. Preheat oven to 325 degrees F.
  2. In a medium bowl, whisk one whole egg.  *Add 4 egg yolks, reserving the whites for the meringue in a separate bowl.  Whisk the egg and yolks until they are a uniform color.
  3. Stir in sweetened condensed milk and sour cream.
  4. In a small bowl, combine lime juice and sugar until the sugar is dissolved.
  5. Pour sugared juice into the egg mixture and thoroughly combine.
  6. Pour filling into graham cracker crust and bake 20 minutes.  Once the pie has baked, place it on a wire rack and increase oven temperature to 350 degrees F.
  7. Once egg whites are at room temperature, add cream of tartar and salt to the bowl and beat until the whites form soft peaks.
  8. Continue to beat while sprinkling in 1/3 cup sugar.  Beat until egg whites form firm peaks.
  9. Spread meringue on top of pie with a spatula, sealing it to the edges of the crust.  Smooth the meringue over or dot it with the back of the spatula to form peaks.
  10. Bake for 12 minutes.
  11. Remove from oven and let cool on a wire rack.  Serve at room temperature or chilled.
Breaking it down:
Beat egg and yolks...
...and add sour cream and sweetened condensed milk.
In a separate bowl, stir together the key lime juice and the sugar.
Add that to the original egg mixture and stir well.
And when you're taking pictures, be sure to reapply nail polish!
Pour into your graham cracker crust and bake for 20 minutes at 325 degrees.  Then, after removing the pie, turn your oven up to 350 degrees.
A note about the crust: when I was making this with my godsister, we followed some instructions on the crust package to make it "golden."  This involved brushing it with an egg or possibly an egg yoke, baking it for about 5 minutes, and allowing it to cool completely before filling it.  I couldn't tell the difference between a regular crust and a golden crust, but if you can, go for it!
Anyway, make your meringue and top your pie.
I chose the peaking style for the meringue.  It is unbelievably fun to do.
And it turns out like this!
Beautifully golden and scrumptious. :D
Needless to say, everyone enjoyed the pie.
Even despite the storm!

Have a great day,
-JJ

Saturday, February 18, 2012

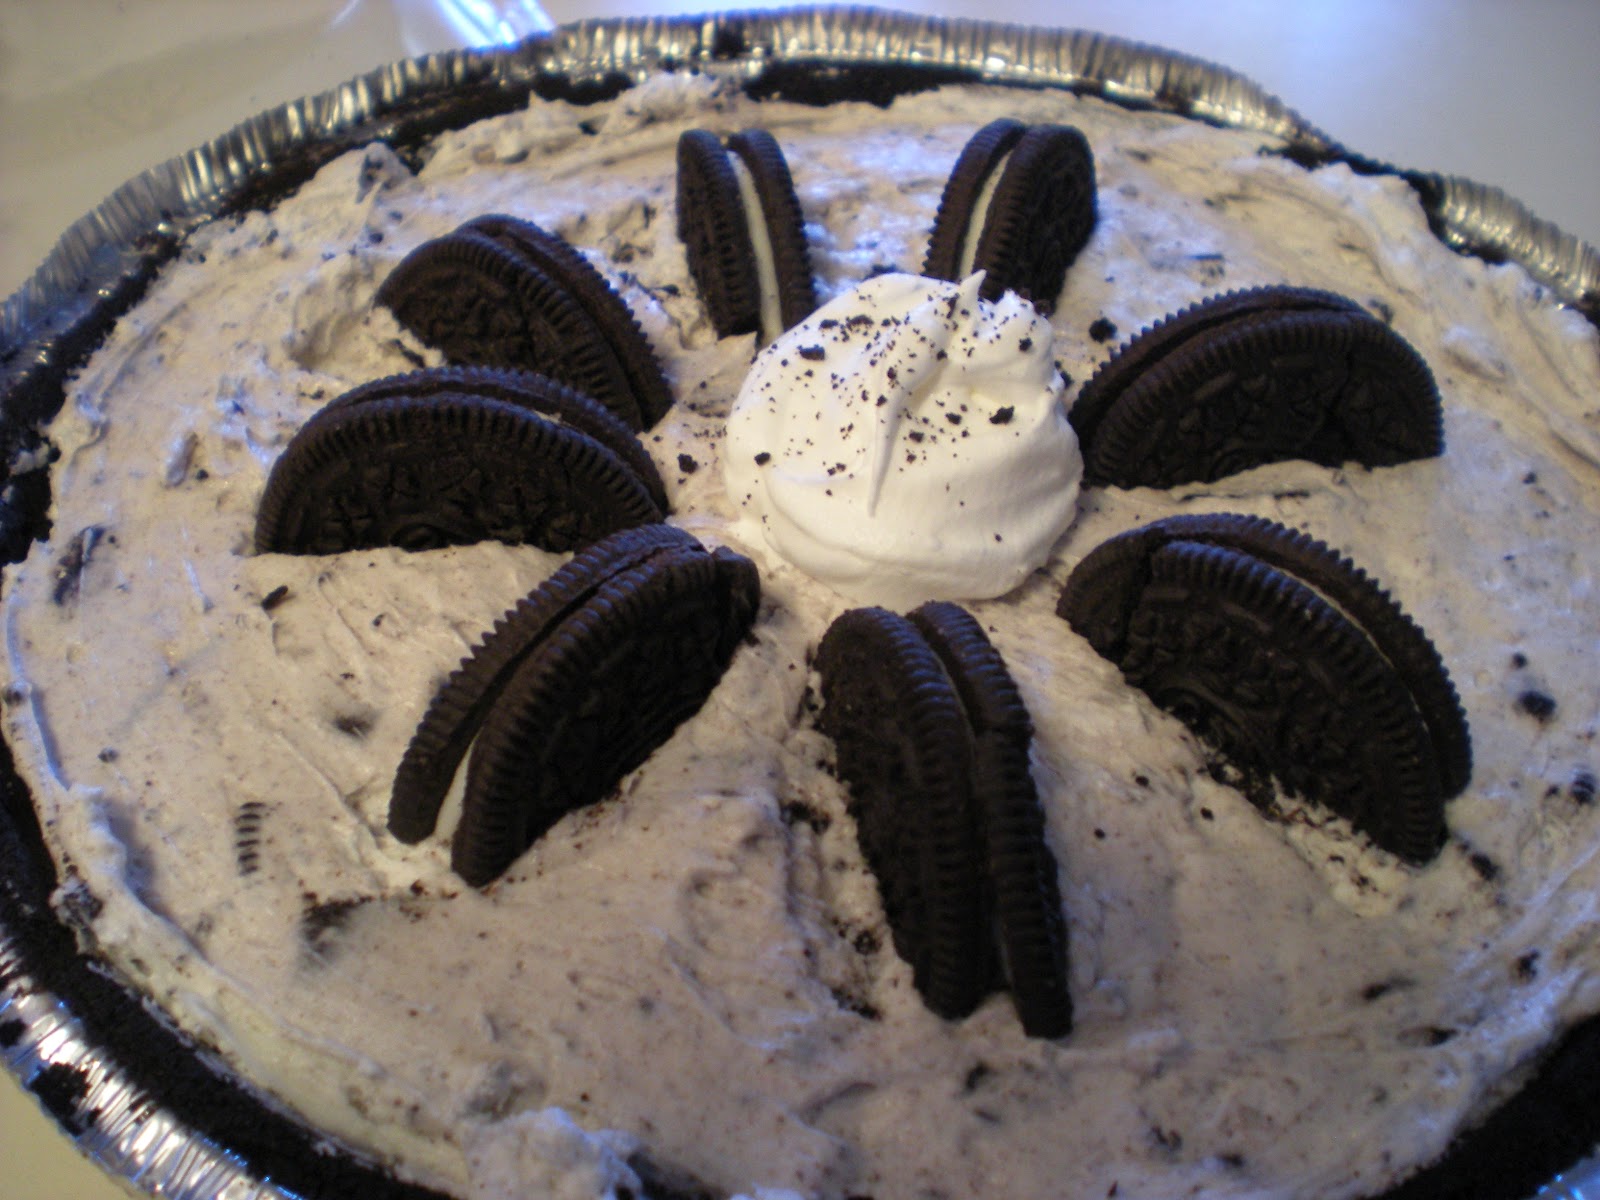
Oreo Pie

OREOS = NOMS


For my mom's birthday, she wanted me to make her an Oreo pie.  Since I'd been dying to make one since December, it's more of a gift for me than from me! ;)

Ever since I saw this recipe on therepressedpastrychef.com, I wanted to make this.  Badly.  So now I have, and hopefully it will satisfy my Oreo craving, too! XD  You can find the original recipe here, but of course I've made some tweaks and notes.

Oreo Pie
1 Oreo pie crust
17 Oreo cookies
8oz cream cheese, softened
1/3 cup sugar
2 cups Cool Whip*, plus more for garnish

  1. Place 12 Oreos in a plastic bag and crush into small-to-medium pieces.
  2. Combine cream cheese and sugar in a medium/large bowl until light and fluffy.
  3. Add Cool Whip and crushed Oreos.  Stir gently with a rubber spatula or wooden spoon until the Cool Whip and Oreos are evenly distributed.
  4. Spoon into the Oreo pie crust and smooth with spatula.
  5. Scoop a dollop of Cool Whip into the center of the pie.  Cut 4 Oreos in half and arrange them evenly around the dollop.  Take the cookie part of remaining Oreo and sprinkle dollop with cookie crumbs.  (Eat the rest of the Oreo :D)
*Note: I used Lite Cool Whip, and it tasted just fine - with less calories.  You can also use Reddi-Whip or any other whipped topping.

Breaking it down:

Crush 12 Oreos...
 
(I did it with a spoon in a bowl like the original recipe said, but it'll probably go much less messier in a plastic bag.)  The pieces should be about this big:
 Then combine your SOFTENED cream cheese with sugar...
and seriously, use an electric mixer/beater to do this.  For someone who detests taking the "lazy route," this saves a LOT of time.
So now that it's light and fluffy, add the Cool Whip...
and the crushed Oreos...
and stir.
When thoroughly (and gently!) stirred, it will look like this:
Now unwrap your pie crust (unless you've made one of your own and then I am in awe of you and your awesome) ...
Add spoon the filling into it.
Smooth it out with a spatula and garnish as directed or desired. :)
I really liked this pie - and so did my mom! :) Despite only having five ingredients (and one of them Cool Whip) it tasted amazing!
Have an scrumptious day!
-JJ

Sunday, December 11, 2011

My Missing Thanksgiving Recipes

I made a total of three baked goods for Thanksgiving 2011, which turned out to be two too many - for the Thanksgiving crowd, that is.  The leftovers turned out to be the best of the three. :)

So first, for that traditional Thanksgiving dessert, there was the pumpkin pie.  No pictures, sorry. :'(  The recipe is Eagle Brand's Perfect Pumpkin Pie, found here.  There were no leftovers! :D

At a Halloween party the other year, I had pumpkin bread for the first time - with chocolate chips.  Which, of course, made me fall in love with it, being the chocoholic that I am.  So I had to try to make a few loaves myself.  I used this recipe, from Taste of Home.  The results were good, although it couldn't compare to the chocolate chip pumpkin bread I'd had at that party.  The crust was rather dry and the chocolate chips were rock-hard, but the taste was good.

And finally, my crowning achievement of the day, brownies.  Ah, those brownies.  (Which turned out to have been totally unnecessary, as there was a whole batch of other brownies already - but these were better by about a thousand times XD)  I'd had half a jar of caramel topping left over from a cookie bar recipe, and I needed something to do with it.  So I thought, caramel in brownies, why not?  After searching half an hour for a good recipe, I stumbled upon the best brownie recipe that I'd ever tried: Layers of Love Chocolate Brownies.  Semisweet chips and chocolate brownie and white chocolate chips and pecans and caramel... I don't think I can ever go back to a regular old chocolate chip brownie again.  They are that good!!  Just a note: I expected the white chocolate (I know, I know, the dreaded faux-chocolate - that, I admit, I'm starting to like :O) to be all melted - but it wasn't, and it was awesome anyway.  EAT THIS WITH A FORK.  It's sticky and wonderful and insanely rich and is just the thing for a chocoholic like me. :D  Unfortunately, I didn't take any pictures of anything I'd made, so I'll just have to make these again to snap a few photos... ;)

Wednesday, October 12, 2011

Double S'More Pie

My FIRST original recipe!  Kinda sorta!

Double S'More Pie
Ingredients:
   Graham cracker crust (your favorite recipe or store-bought)
   1 1/2 cups semi-sweet chocolate chips
   1 1/2 cups milk chocolate chips
   1 14-oz. can sweetened condensed milk
   1 1/2 teaspoons vanilla
   5 extra-large marshmallows
Directions:
   Combine semi-sweet chocolate chips, 1/2 can of sweetened condensed milk, and 3/4 teaspoon vanilla in medium microwave-safe bowl.  Microwave for 1 minute at 50% power.  Stir.  Microwave for another minute at 50% power.  Stir until smooth, and pour into crust.  Refrigerate while preparing the second layer.
   Combine milk chocolate chips, remaining sweetened condensed milk, and 3/4 teaspoon vanilla in medium microwave-safe bowl.  Microwave for 1 minute at 50% power.  Stir.  Microwave for another minute at 50% power.  Stir until smooth, and pour over first layer.  Refrigerate while preparing marshmallows.
   Cut each extra-large marshmallow into short thirds.  (You should have 15 pieces.)  Take pie out of refrigerator and toast marshmallow thirds one at a time over an open burner.  TAKE CAUTION.  Once toasted to your liking, place on second layer of pie.  Repeat with the other pieces until you can't fit any more onto the pie.
   Refrigerate, covered,  for 2 hours or until set.

The final result:

It may not be über-gorgeous, but when you look at it, you know it's a legit s'more pie, and that's all I was going for.


And it was delicious.  :)

NOTE: This is INSANELY fudgy rich pie, so don't cut big pieces.
Related Posts Plugin for WordPress, Blogger...