Wednesday, August 29, 2012

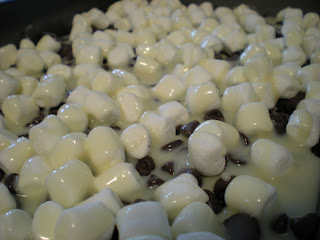
An Attempt at S'More Cupcakes


Let me explain why this is an attempt.

These cupcakes epic failed.  And I know that's practically an archaic term now, but it's so unbelievably true.  They epic failed.

And I know exactly what I did wrong.

I'm sure these would have turned out absolutely delicious, except that I sort of managed to mess them all up.

The result: cupcakes that weren't baked through at ALL on the bottom half and collapsed in the middle.  In other words: nasty.

And then I realized one thing that had gone wrong - the pan I'd put beneath the cupcake pan to catch drips had been literally underneath the cupcake pan.  As in, the pans were stacked.

Well, no wonder the bottom half wasn't baked.

And as for the collapsing, I have no idea.  I'm sure a thoroughly-baked lower half would have helped with the collapsing issue, and the collapsing isn't really a big deal.  Just cover it up with an extra marshmallow and ganache, like so in the picture above.

This recipe was from Bakerella, and you will find it here.  Where she did it right.

But I'll break it down for you anyway:
Make your graham cracker cupcake batter...
And your chocolate cupcake batter...
And then your graham cracker topping.  Try not to eat this right away.  It's gonna be hard, but you can make it.
Pour in some graham cracker batter and top with the topping..,
And marshmallow halves.
Top with the chocolate cupcake batter...
And more gorgeous graham cracker topping.
Bake as directed.  Hopefully yours won't spread out over the top of the pan as much as mine did.  Try actually filling the cupcake cups 3/4 of the way full.  And the drip pan does not go directly beneath the cupcakes!  No, no, no, no, no!  Also, me being a person suffering from the common sweet tooth, I found the ganache to be too bitter.  Add some sugar to the ganache and taste it if that's the case with you, too.
Well, on to the next recipe!
-JJ

Saturday, August 25, 2012

Power Bars


Last spring we went to the Caribbean island of St. John in the U.S.V.I.  And it was awesome.  

Something we do every time our family goes there: the snorkel sail on the Pepper.  That's a bunch of nouns bunched together, I know, but hear me out:
1. Get on sailboat, which is called the Pepper.  It is a very nice boat owned by some very nice people.
2. Get sailed to a point in the ocean.
3. Get out and snorkel around.
4. Get back in the boat and, on the way home, eat a fantabulous and healthy lunch with the crew of two.
In other words, a very fun day.

And I had the fortune to taste some homemade and deee-licious power bars during that lunch.

Now, Pepper's owners have recently written a book called Between the Sheets.  It's about their clients that they take on those snorkeling sails (not me, I assure you! xD) and the people in the house that they rent out on St. John.

It's a great book that aptly describes island life - where time is an approximation - and it also has some island recipes.

Including those power bars.

So of course I made them.

And they're just as good as the first time I had them.  And they're very satisfying to make.  But they make a lot - two whole 9x13 inch pans - just warning ya!

Power Bars
4 cups oats
2 cups brown sugar
1 cup flour
2 sticks butter, melted
6 eggs
1/4 cup applesauce
1/4 cup honey
1 tablespoon vanilla
Dash of cinnamon
2 cups dried fruit mix, chopped (preferably pineapple, papaya, mango, and coconut)
  1. Preheat oven to 350 degrees F.  Grease two 9x13 inch pans.
  2. Combine oats, brown sugar, and flour in a large bowl.
  3. Combine with melted butter.
  4. Stir in eggs, applesauce, honey, and vanilla.
  5. Add cinnamon and combine thoroughly.
  6. Stir in fruit mix.
  7. Spread evenly into two prepared pans and bake 20 minutes
  8. DO NOT REMOVE FROM OVEN.  Turn oven off and keep pans inside until the bars are no longer gooey.
  9. Remove and let cool completely before cutting.

Breaking it down:
Combine your oats, brown sugar, and flour...
This is incredibly fun to make because there's so much of it and it just requires a wooden spoon! :D
Add butter...
And eggs...
And vanilla and applesauce and honey and cinnamon.  Yes, I know that's not applesauce over there.  I had no applesauce to work with and I desperately wanted to make these, so I substituted crushed pineapple inside.  Let me tell you, applesauce works and tastes better.  Although maybe it's slightly less tropical.  Your choice!
Add the chopped fruit - and yes, you DO need to chop it even though it's already chopped.  Just chop it into quarters, whatever kind of fruit it is, and you should be fine.
Bake the bars at 350 degrees for 20 minutes and let them cool in the oven if they're still gooey.  I've made these bars twice and they always have been gooey...
But delicious.  And semi-healthy!
Enjoy!
-JJ

P.S. You probably noticed the awkward change in font.  That's because my computer was being screwy and I had to do some very technical copying-and-pasting, and I'm just wayyy too lazy to go back and retype it in the proper font.  If you didn't notice, then I guess you haven't spent too much time on my blog yet!  Look at the suggested posts below to explore! :D

Wednesday, August 22, 2012

Chocolate Chunk Brookies


Ever since I heard the term "brookie," I was hooked.  Cookies and brownies combined must mean awesome, right?

Well...

While I'm not saying these aren't good, I'm just saying I don't like these that much.  I mean, I'm so not a blondie fan it's unbelievable.  Unless it has white chocolate in it.  Then yes.

And these brookies tasted like blondies with chocolate chunks.  (Yes, yes, I know, it's supposed to be chocolate chips but I made do with what I had on hand at the time.  Chunks work just fine.)

I got this recipe from Bakerella, and I'm sure these would have been better if I had her oven.  Like, seriously, hers turned out amazing-looking and absolutely delicious, I'm sure.  But mine... they sort of collapsed and didn't really cook in the middle.  Which is fine and all if it tasted like cookie dough - but it DIDN'T.

Now that I think about it, the edges were really tasty.  But the middle...  And this is coming from the girl who loves cake batter, cookie dough, pretty much anything raw.  This should not be raw.  Nooo.
So, if your oven is like mine, please see the asterisk* for baking instructions.  If your oven runs hot like Bakerella's, use the normal baking instructions.  I really don't know what the difference between our ovens are except that mine is a few years old and not specifically for baking.  I'm not even going to try to guess what other bakers have.  It'll just make me feel inadequate. XP

Anyhoo, here's the recipe if you want to try it.  Not saying you shouldn't, but I'm not saying you should, either.  I'll find scrumptious things to bake yet, don't you worry!

Chocolate Chunk Brookies
REQUIRES SOFTENED BUTTER

2 3/4 cups all purpose flour
2 1/2 teaspoons baking powder
1/2 teaspoon salt
2/3 cup butter, softened
2 1/4 cups light brown sugar
3 large eggs
1 teaspoon vanilla
2 cups chocolate chunks
  1. Preheat oven to: 350 degrees F.  Grease a 9x13 inch pan.
  2. Combine flour, baking powder, and salt in a large bowl with a fork.
  3. In a separate bowl, cream brown sugar and butter.
  4. Add eggs one at a time, stirring well after each addition.  Stir in vanilla.
  5. Stir in chocolate chunks.
  6. Add flour mixture and stir until thoroughly combined.
  7. Bake 30 minutes.  If not done in the middle, cover with aluminum foil and bake additional time.  Test with a toothpick every 5 minutes.  Bake until golden brown and do not over bake.
And now I'll break this down for ya - but note that I only made a half-batch!  Maybe that's my problem...

Combine butter and brown sugar...
Add eggs...
Stir well and add vanilla.
Stir in those chocolate chunks...
Add the flour mixture...
And spread into your pan.
Now this is what mine looked like at first...
But unfortunately the center collapsed and I was left with this.  While it does look appetizing, it was only slightly baked.  I.e. almost raw.  And almost raw is wayyyy more nasty than raw.  It is awful.
But the sides came out quite nicely.
If a little crunchy.  You can see the raw-ness inside here.
I wish you luck on this baking endeavor should you choose to try it!
Otherwise, thank you and have a jolly good day!
-JJ

Saturday, August 18, 2012

Extra-Chocolatey Chocolate Euphoria Cookie Bars


Yes.


A thousand times yes.

Once I saw this in Joanne Fluke's Devil's Food Cake Murder, I was in love.

Completely in love with this recipe.  Even the name screams CHOCOHOLIC!
Okay, in the original recipe, the frosting is just a suggestion at the end of the actual recipe.  But HEAR ME OUT before you decide that it's too much chocolate!

One, the fudge frosting makes these look more like brownies and less like little cookie bars of death by chocolate chips.
Two, chocolate chips exposed to hot air (but not long enough to melt) taste sort of sketch.

Three, the frosting holds the whole cookie bar together and makes it look thicker.

Four, if you're only making a half-pan of this (8x8), then you'll have half a can of sweetened condensed milk leftover.  And if you're like me, the temptation of plain sweetened condensed milk sitting in your refrigerator cannot be resisted, no matter how much you try.  But if you make the frosting too, then you won't have any sweetened condensed milk leftover.  This is a good thing.

Five, it's more chocolate.  And that is never wrong.

So now you have my reasons.

I have made this twice so far.  And both times it received standing ovations.  Well, not really, but I got a lot of compliments, okay?

The first time I made the whole batch, with frosting.  The second time I made a half-batch, again with frosting.  I think the frosting adds a lot, though.  It makes it seem like the whole bar is going to be smooth and then you hit the cereal and the Oreo crust and it's like CRUNCH.

What's that?  Oreo crust?  Cereal?  What's in these things?  Let me break it down for you.  In order.

Oreo crust.  Semisweet chocolate chips.  Mini marshmallows.  Sweetened condensed milk.  White chocolate chips.  Chocolate cereal.  Milk chocolate chips.  Optional but highly recommended fudge frosting.

Ohhhhh yes.

About the cereal.  (Yes, I know, shut up already we want the recipe, but you might just want to pay attention to this.)

The original recipe calls for Cocoa Puffs or Cocoa Krispies.  Now, I have grown up on Cheerios and Oatmeal Squares, and I have never had these - and for good reason.  There is NOTHING healthy in them.  Like absolutely zilch.  And while these cookie bars are the opposite of healthy, I feel a lot better if I try to stick something half-healthy in there.

Chocolate Chex, baby.  It exists, and it's good.  And it's sort of healthy.  And it has plain Rice Chex in there too - which gives the cookie bars some more contrasting color.

Also, it crunches really truly delightfully when you take a bite.  It's an experience that you don't want to miss out on.  I'm serious.  That crunching noise it makes seriously has made my day.  Really.

Oh, right, also - WARNING: You will become addicted to these bars.  You will want to make lots and lots of them.  You will become a chocoholic like meeee. *evil chuckle*

Chocolate Euphoria Cookie Bars - with Chocolate Frosting
2/3 package Oreos (approximately)
1 stick butter
3 cups semisweet chocolate chips, divided
2 cups miniature marshmallows
2 14 oz. cans sweetened condensed milk
1 cup white chocolate chips
2 cups Chocolate Chex
1 cup milk chocolate chips
  1. Preheat oven to 350 degrees F.  Grease 9x13 inch pan.
  2. Crush Oreos and measure out 1 1/2 cups.
  3. Melt stick of butter in large microwave-safe bowl.  Add crushed Oreos and combine thoroughly.
  4. Spread Oreo mixture into prepared pan.  Sprinkle extra crushed Oreo over gaps if necessary.
  5. Evenly sprinkle 1 cup semisweet chocolate chips over Oreo crust.
  6. Evenly sprinkle miniature marshmallows over the semisweet chocolate chips.
  7. Pour 1 can sweetened condensed milk over marshmallows as evenly as possible.
  8. Sprinkle white chocolate chips over that as evenly as possible.
  9. Sprinkle Chex over white chips as evenly as possible.
  10. Sprinkle milk chocolate chips over Chex as evenly as possible.
  11. Press down on layers with the back of a metal spatula.
  12. Bake 20-25 minutes.  Remove from oven and let cool on a wire rack.
  13. While the bars cool, melt remaining 2 cups semisweet chocolate chips in a medium saucepan over low heat, stirring constantly.
  14. Once melted, add remaining can of sweetened condensed milk to the chips and stir vigorously for about 2 minutes.
  15. Remove from heat and immediately spread on fully-cooled bars.
  16. Once the frosting on top has cooled, cut into bars and refrigerate covered.  Makes 24 bars.

Breaking it down:
Melt the butter...
Combine with those crushed Oreos...
And spread out a beautiful Oreo crust for yourself.
Sprinkle with those semisweet chocolate chips...
Then the marshmallows...
And then pour on that sweetened condensed milk that I've ranted about so many many times.
Sprinkle on those white chocolate chips...
And the Chocolate Chex (because if you're using another cereal you SHOULDN'T BE)...
And at last, the milk chocolate chips.
Press it down and bake it for 20 minutes at 350 degrees.  So delightful.
Whip up your frosting while all this loveliness cools...
And frost those puppies!  Delish!
And of course, while you enjoy probably 5 million milligrams of caffeine and pure chocoholic high heaven, eat it with a fork. xD
You will be in love.  I guarantee it.
-JJ

Wednesday, August 15, 2012

Key Lime Pie

Now, first off, I'll apologize for the crappy lighting on this picture of the pie.  I'm sorry.  Now I'll tell you why it happened.

This pie is the dessert I baked in Minnesota for the Fourth of July.  We'd have a nice ol' grill and a piece of pie to finish off the night as we listened to fireworks exploding in the distance.  (Watching them was not an option - we didn't have lawn chairs and you do not want to sit outside at night in northern Minnesota for more than one minute.  Then you're just a mosquito buffet table.)

But, surprise surprise, a storm hit and our power was out.  You can see the beginnings of the storm, sort of, in the window.


Luckily, the pie had already been baked, but we had to eat it in the dark.  Which means only that one picture at the top of the post of the finished thing, all nicely sliced up.

So as you can tell from the pictures, I made this at the cabin, on that beautiful lime green table.  (See what I did there?)  It's seriously the smallest kitchen I have ever been in that isn't inside a hotel.  Actually, I've been in hotel room kitchens that are bigger than that kitchen.  But not as well-stocked.  No, we've got all the spices.  And like three pounds of raisins.  Not kidding.

Anyway, a key lime pie is pretty easy to make, and rather than just use the recipe off the back of the key lime juice bottle for the zillionth time, I decided I'd try Joanne Fluke's recipe from, you guessed it, Key Lime Pie Murder.

It's lighter and fluffier and easy to make and very good.  And yes, this is made with a meringue, and yes, you absolutely should make this with the meringue.*  If you don't want to make a meringue, then don't use this recipe and use the one off the back of the key lime juice bottle.

Key Lime Pie
REQUIRES EGG WHITES AT ROOM TEMPERATURE

1 graham cracker crust
5 eggs
14-ounce can sweetened condensed milk
1/2 cup sour cream
1/2 cup key lime juice
1/4 cup sugar
1/2 teaspoon cream of tartar
pinch of salt
1/3 cup sugar
  1. Preheat oven to 325 degrees F.
  2. In a medium bowl, whisk one whole egg.  *Add 4 egg yolks, reserving the whites for the meringue in a separate bowl.  Whisk the egg and yolks until they are a uniform color.
  3. Stir in sweetened condensed milk and sour cream.
  4. In a small bowl, combine lime juice and sugar until the sugar is dissolved.
  5. Pour sugared juice into the egg mixture and thoroughly combine.
  6. Pour filling into graham cracker crust and bake 20 minutes.  Once the pie has baked, place it on a wire rack and increase oven temperature to 350 degrees F.
  7. Once egg whites are at room temperature, add cream of tartar and salt to the bowl and beat until the whites form soft peaks.
  8. Continue to beat while sprinkling in 1/3 cup sugar.  Beat until egg whites form firm peaks.
  9. Spread meringue on top of pie with a spatula, sealing it to the edges of the crust.  Smooth the meringue over or dot it with the back of the spatula to form peaks.
  10. Bake for 12 minutes.
  11. Remove from oven and let cool on a wire rack.  Serve at room temperature or chilled.
Breaking it down:
Beat egg and yolks...
...and add sour cream and sweetened condensed milk.
In a separate bowl, stir together the key lime juice and the sugar.
Add that to the original egg mixture and stir well.
And when you're taking pictures, be sure to reapply nail polish!
Pour into your graham cracker crust and bake for 20 minutes at 325 degrees.  Then, after removing the pie, turn your oven up to 350 degrees.
A note about the crust: when I was making this with my godsister, we followed some instructions on the crust package to make it "golden."  This involved brushing it with an egg or possibly an egg yoke, baking it for about 5 minutes, and allowing it to cool completely before filling it.  I couldn't tell the difference between a regular crust and a golden crust, but if you can, go for it!
Anyway, make your meringue and top your pie.
I chose the peaking style for the meringue.  It is unbelievably fun to do.
And it turns out like this!
Beautifully golden and scrumptious. :D
Needless to say, everyone enjoyed the pie.
Even despite the storm!

Have a great day,
-JJ
Related Posts Plugin for WordPress, Blogger...