Saturday, January 28, 2012

Modified Triplet Chiplet Cookies


Remember those Mega Chocolate Cookies?  These - from Joanne Fluke's Cream Puff Murder - are those, with only three kinds of chips and no nuts - although originally, the recipe called for cashews.  Some of my friends are picky eaters, however, and do not enjoy the taste of nuts, unlike sane people. :P  So I changed it.  And halved it, since the original recipe makes 10-11 dozen cookies. :O  That's a lot.                        
Here's the modified recipe:

Modified Triplet Chiplet Cookies
Ingredients
   2 sticks softened butter*
   1 1/2 cups white sugar
   3/4 cups brown sugar
   2 teaspoons vanilla
   1 teaspoon baking soda
   1/4 teaspoon salt
   2 beaten eggs (whip them up in a glass with a fork)
   2 1/2 cups flour
   1/2 cup white chocolate chips
   1/2 cup milk chocolate chips
   1/2 cup semisweet chocolate chips**
Directions
   Preheat oven to 350 degrees F., rack in the middle position.
   Cream butter with sugars.  Add the vanilla, baking soda, and salt.  Mix well, then add eggs.
   Add 1 cup of flour and stir well.  Then add the chips.  Mix thoroughly, and add the remaining flour.
   Drop by rounded teaspoons onto greased or nonstick cookie sheets, 12 cookies to a standard-sized sheet.  If the dough is too sticky to handle, chill it for an hour and try again.
   Bake for 11 minutes or until golden.  Let cool for two minutes and then remove to a wire rack.
   Yield: 5-6 dozen.

* The original recipe calls for melted butter, but from personal experience I know that THIS IS A BAD IDEA.  Melty butter = flat cookies.

** The original recipe also calls for a cup of salted cashews.  See explanation above recipe for why I didn't use cashews.  Instead, stupid me thought, oh, I can add more chips, riiight?  Well, I added a third-cup more of each chocolate chip type, and my butter was a bit too soft, and this is what I got:


Very flat.  I tried chilling the dough, but the cookies were just as flat.
So, I stirred in four heaping teaspoonfuls of flour and the cookies became, well, less pancake-like and more cookie-like.
I recommend following the actual recipe.  Except for the melted butter, of course.  Just visit Joanne Fluke's website, murdershebaked.com.

This time baking, I was responsible and took photos of nearly every step!  So, just follow along as you're baking...

Cream butter and sugars...
Stir in vanilla, baking soda, and salt...
Add eggs...
Mix in 1 cup of flour...
Add chocolate chips...
Mix in the rest of the flour...
Drop onto cookie sheet...
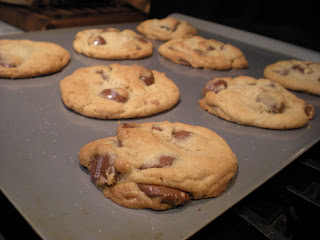
Bake for 11 minutes and they should come out like this!

Lots of chocolate = lots of noms. <3
-JJ

Wednesday, January 25, 2012

NY Times Chocolate Chip Cookies


Being the late lemming that I am, I hadn't made the New York Times Chocolate Chip Cookies until, oh, mid-October.  And being the lazy blogger that I am, I'm posting it now.  In January.  Oops! XD

So.  These are supposed to be the best chocolate chip cookies on the planet - and I gotta say, they come pretty close, considering they're not made out of chocolate chips at all.  Instead, they use discs of chocolate and loads of wacky ingredients, like cake flour.

I had all the ingredients, somehow, except for perhaps the most important part - the chocolate discs.  60% cacao.  If you're like me, and you shy away from any chocolate that could possibly be considered bittersweet or extra-dark, you will, no doubt, pick up a bag of Hershey's Drops and say, "Oh, this'll do."

It won't.

Not kidding.

Of course these cookies were ah-mazing, but they were overly sweet, and, never having had Hershey's Drops before, I found the chocolate... disgusting, actually.  And yet, the cookies were still fantastic.  That's how good the dough is.  Really.


So, NEVER make these cookies with Hershey's Drops.  They don't melt and they are way too sweet.  (And that's saying something, coming from the major chocoholic who thinks "sweet" is a food group.)  Instead, you could actually try following the recipe, or, like I plan to do the next time I bake these, experiment with semisweet chocolate chunks.  Obviously, it won't be the same as the original recipe - which I should also try - but maybe I'll get lucky! :)

The recipe can be found here.


lotsa noms
-JJ

Saturday, January 21, 2012

Mixed Berry Cobbler


Out of all my baking adventures, this is the one dish that I make the most.  I've served it to family, friends - even used it in a how-to presentation!  This is a recipe adapted from Martha Stewart's Best Berry Cobbler, found here or in the August 2009 Martha Stewart Living magazine.  It's only a slight variation - from blackberries to raspberries, blueberries, and strawberries.  But this is an amazing cobbler and you should absolutely try it!! ;)

Mixed Berry Cobbler
1 1/2 cups all-purpose flour
2 teaspoons baking powder
1/2 teaspoon salt
1 stick cold unsalted butter, cut into small pieces
3/4 cup cold heavy cream, plus more for brushing
1/4 teaspoon ground cinnamon
1/2 cup sugar, plus more for sprinkling
3 tablespoons cornstarch
6 cups berries
  1. Preheat oven to 375 degrees.
  2. Combine flour, baking powder, and salt in a large bowl. Add butter in with a pastry blender until mixture resembles coarse meal. Add heavy cream in a slow, steady stream, mixing with a wooden spoon until dough just comes together. Divide dough into 9 pieces, and loosely form each into a ball.
  3. Whisk together cinnamon, sugar, and cornstarch in a bowl. Add berries; toss gently to coat. Transfer mixture to an 8-inch square baking dish. 
  4. Top berries with dough balls, 3 by 3. Brush dough with heavy cream, and sprinkle with sugar. Bake until berries are bubbling in center and biscuits are golden brown, about 45 minutes. Transfer dish to a wire rack, and let cool for 30 minutes.
Let's break it down:
Combine flour, baking powder, and salt...
Add butter and mix until it resembles coarse meal...
Then add cream and mix until the mixture just comes together.
Whisk cinnamon, sugar, and cornstarch...
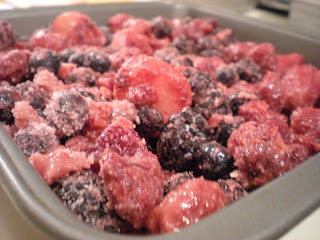
Add berries and toss to coat.
Transfer to a square baking dish...
Form dough into 9 balls and top berry mixture...
Brush with cream...
And sprinkle with sugar...
...and bake for 45 minutes.
Let cool for half an hour, and then enjoy! :)
-JJ

Wednesday, January 18, 2012

An Accidental Original Recipe


So.  This OR is an accident, adapted from the Repressed Pastry Chef's Yellow Butter Cake and the Chocolate Buttercream Frosting from Passion for Parties.  Since I'm one of those people who doesn't have all the time in the world on their hands and I like to do multiple things at once, I started the cake and the frosting at the same time.  So I add a teaspoon of vanilla to the frosting, do some stuff, and add a teaspoon of vanilla to the cake batter... and then there's no more vanilla.  And the recipe calls for 2 teaspoons.  :O
Since I was making this cake for my dad's birthday, I asked him what other flavoring he wanted in the cake.  His reply was, "maple and rum."  Both.  In the same cake.  Sure thing, dad.
As reluctant as I was, I added maple and rum flavoring to make up for the lost teaspoon of vanilla, and the cake turned out fine... strange... but fine.  It's actually kind of an interesting taste - one that would have tasted much better if not for the chocolate frosting.
But, if you're adventurous and like interesting flavors, try my OR!

Maple-Rum Butter Cake with Chocolate Buttercream Frosting
REQUIRES SOFTENED BUTTER

Maple-Rum Butter Cake
3 1/2 cups cake flour
2 cups sugar
1 tablespoon baking powder
1/2 teaspoon salt
2 sticks unsalted butter, softened and diced
1 cup milk (divided use)
4 large eggs
2 large egg whites
1 teaspoon vanilla extract
1/2 teaspoon maple flavoring
1/2 teaspoon rum extract

Chocolate Buttercream Frosting
1/2 cup solid butter-flavored/vegetable shortening
1 stick butter, softened
3/4 cup unsweetened cocoa
1 teaspoon vanilla extract
4 cups powdered sugar
3-4 tablespoons milk

For the cake:

  1. Preheat oven to 350 degrees F.  Coat two 8'' cake pans lightly with nonstick cooking spray.
  2. Cream butter and 1/2 cup milk in large bowl.  Sift flour, sugar, baking powder, and salt into bowl and mix thoroughly.
  3. In separate bowl, blend eggs, egg whites, remaining 1/2 cup milk, and flavorings.  Add to batter in 3 additions, mixing thoroughly after each addition.
  4. Divide batter evenly between the two pans.  Bake 35-40 minutes, or until the centers spring back when lightly touched.
  5. Cool completely in pans on wire racks.  Release sides and bottoms of layers with a plastic knife before turning out and frosting.
For the frosting:

  1. Cream shortening and butter in a large bowl.  Add cocoa and vanilla.
  2. Add powdered sugar, one cup at a time.  Mix thoroughly after each addition.
  3. Add milk and beat until light and fluffy.  Makes 3 cups.  (Can be refrigerated in a stored container for up to 2 weeks - just re-whip before using.)
Now, breakin' it down:
Cream butter and milk in bowl.  Sift flour, sugar, baking powder, and salt into bowl...
...and mix.
In a separate bowl, blend eggs, egg whites, milk, and vanilla...
...and add to batter.  Divide batter between two pans...
...and bake for 35 minutes.
Cream shortening and butter...
Add cocoa and vanilla...
...and mix.
Add powdered sugar, a cup at a time...
...and mix well.
Add milk and beat until light and fluffy.
Now, flip out your cakes and frost the top of the first layer...
Then put the second layer on top and "seal-coat" the whole cake.  Be careful, as crumbs might want to stick to your frosting knife/spatula!  Then go ahead and frost the whole thing thoroughly - you should have just enough frosting!
So the OR turned out to be a success, despite the wacky flavors! :)  The cake was best the first day, but the frosting gets better with age.  The frosting also seemed too light for this incredibly buttery cake - next time I'll try something more thick and heavy.
And if you want the original recipes, you can find the cake one here and the frosting recipe here.  Tell me how it turns out! :)
-JJ

Saturday, January 14, 2012

Almond/Cashew Winter Bark

Winter bark is a popular gift during the holiday season... which has passed us already.  But still.  This recipe is from Martha Stewart, and surprisingly, it isn't that hard!  I know, shocker!  But it's an adapted one.  If you want the real recipe, visit her site here or check it out in her December 2008 Martha Stewart Living magazine.

Almond or Cashew Winter Bark
REQUIRES CHILLING TIME (1 hour)

8 oz. white chocolate chips
12 oz. bittersweet chocolate chips
1 1/2 cups almonds or cashews
  1. Melt white chocolate chips in a heat-proof bowl set over a pan of simmering water, stirring occasionally.  Remove from heat.
  2. Melt bittersweet chocolate chips in the same setup (obviously washed or in a new bowl), stirring occasionally.  Stir in nuts.
  3. Spread bittersweet mixture on a parchment-lined rimmed baking sheet, spreading peanuts in a single layer.  Drop spoonfuls of white chocolate on top, and swirl chocolates with a skewer/fork/whatever.
  4. Refrigerate until set, about 1 hour.  Break bark into large pieces.  Bark will keep, well-covered and refrigerated, for up to 2 weeks.  (Then it gets yucky.)
Although this isn't the sweetest winter bark, it's still pretty good - the more white chocolate, the better it is! ;)
It's good for giving away as a gift...
...if it lasts that long!
:)
-JJ

Wednesday, January 11, 2012

Old-Fashioned Sugar Cookies


For Christmas, I gave several family members each a box of Old-Fashioned Sugar Cookies, from Joanne Fluke's Chocolate Chip Cookie Murder.  Back to the classics, right? ;) You can visit her webstie here.

Here's the recipe:

Old-Fashioned Sugar Cookies
REQUIRES CHILL TIME (1 hour)

4 sticks melted butter (yes, it's okay to melt them! :D)
2 cups powdered sugar
1 cup white sugar
2 eggs
2 teaspoons vanilla
1 teaspoon lemon zest (optional - but I used it and they tasted AWESOME)
1 teaspoon baking soda
1 teaspoon cream of tartar (critical!)
1 teaspoon salt
4 1/4 cups flour
1/2 cup white sugar in a bowl
  1. Do not preheat oven yet.
  2. Melt butter.  Add sugars and mix.  Let cool to room temperature and mix in the eggs, one at a time.  Then add vanilla, lemon zest, baking soda, cream of tartar, and salt.  Mix well.  Add flour in increments, mixing after each addition.
  3. Chill dough for at least 1 hour.
  4. Preheat oven to 325 degrees F., rack in middle position.
  5. Roll dough in walnut-sized balls.  Roll dough balls in a bowl of white sugar.  Place on a greased cookie sheet, 12 to a standard sheet.  DO NOT FLATTEN DOUGH BALLS WITH GREASED SPATULA!*
  6. Bake at 325 degrees F. for 10 to 15 minutes (mine took 15), or until they have a tinge of gold on the top.  Cool on cookie sheet for 2 minutes, then remove to a rack to finish cooling.  Yield: 8-10 dozen.
*Sorry, Jo, but these cookies spread out too much and crumble when you pre-flatten them.  They'll spread out on their own in the oven.

Now, before we break it down, I only made a half-recipe.  It was Christmas Eve (oh, yes, this is a verrrry late post XD) and I was making another buche.  Buche = busy = not much time for cookies.

Now, breakin' it down:
Melt butter...
And sugars and mix.
Add eggs and mix.
Add vanilla, lemon zest, baking soda, cream of tartar, and salt...
 ...and mix.
Add flour...
 ...and mix well..
Chill for 1 hour.  Preheat oven to 325 degrees F.  Roll in walnut-sized balls and dip in sugar...
 and bake for 15 minutes ROLLED.  Like this:
NOT this:
Because if you bake like this, your cookies will NOT thank you for it:
So.  Bake your dough balls...
and bake for 15 minutes at 325 degrees F.  Your good cookies will come out like this:
You can decorate these any way you want.  Me, I glazed mine in a milk-and-powdered sugar glaze - which was easily dyed pastel green and red with food coloring.  Of course, now that my lazy self has gotten around to posting this after Christmas, holiday colors may not be the best idea now.  Still, these cookies are really, really good, so make them anyway!
Bon appetit!
-JJ
Related Posts Plugin for WordPress, Blogger...